Gallery

Sunday, August 22, 2010

Halloween Mini Book - Part 2

Ok ... I did not work on the minibook as I had wanted to but I actually got a couple of the pages done. It is coming out thick which is what I wanted. So hope you guys enjoy it...


This is the first page of the mini book.

The pages are 6" X 12", and I did not want to use chipboard on each page, so what I did was i cut a Kraft colored cardstock, and since the paper from the kit is already cardstock, I covered the kraft cardstock with it, and then embellished it. The cuts are from the October 31st cart. Of course everything is inked and distressed.

It is still missing some ribbon which I will be adding later, since I just got them today.


This is the second page. The cuts on this page are from Happy Hauntings, except the bats from the October 31st cart. I tried to overlap all the images over the edge of the page to make it more creepy! (LOL). I inked the edges of the dark papers with white ink, and the lights with black inks. I did put some ribbon on this page, because I got some...


Third page this one is a combination of both carts and stickers. I also cut out one of the frames from Happy Hauntings, and I just cut the borders off of it and paste it on to the picture mat. I had to mat the cat because it was too flimsy...

The right border is from October 31st and just placed a ribbon over one of the edges of the border...


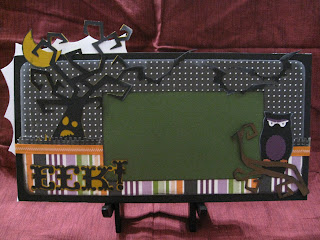
This is the fourth page of the album. The mat in the middle is acually the table top from Happy Hauntings, both bats are from Happy Hauntings as well. I just placed a mat with some ribbon, and the pumpkins from the sticker elements in the paper kit.  Again everything in inked around, I may add some stickles to the title later when the book is done or maybe to the bats.


This was the last page I did today, It is missing a lot of stickling, but I did ink the pumpkin. I cut the pumpkin twice in green and in orange. I cut the orange pumpkin and I pop dotted it on the green one.

The border of the page is cut using the weld function of the gypsy on the rectangle from George and Basic Shapes and the word BOO using the Happy Haunting letters. I cut an extra set of BOO letters in orange and inked it black and pasted it on top of the black cut outs of the page, the rest is just matting and organizing the layout.


I will be back tomorrow with the rest of the book....I hope you like it so far....

~Marie

Saturday, August 21, 2010

Halloween Mini Book - Part 1 (Cover)

I decided to do a Mini Album using the Echo Park Halloween Line and the Cricut carts October 31 and Happy Hauntings. In the end I ended up using a little more than these because I used George and Basic Shapes, and French Manor. Let me tell you it was not easy and I am not done yet.

I first did the sketches of each page that would go in the mini book, using the Happy Haunting and October 31 images handbook and the papers from the Kit to give me an idea of how I was going to lay out each page. I rarely do layouts or books without pictures, so this is a first. After all the sketches were done I set out to place the images on my gypsy trying to keep them per page (this was a little bit hard) I will upload a video later (my camera is completely depleted of battery, sorry!)

As I did every page's cuts I selected the paper that would go good with the images, the ribbon and any other embellishment I could think of, to add to my pages. Everytime I had all the elements of the page together, I would place them in a page protector. Once all my images were cut and all my pages were in the sleeves, it was time to start.

Again this is the fitst time I attempt to do a Mini album without pictures...so We have to see how the pages actually come out. I will be posting step by step the mini book being put together, and I will try to upload a video when is done.

So here is the Cover of the Mini book.

For the cover I used the Haunted House from the October 31 Cartridge in black cardstock with all the inner contours, I covered the windows using orange cardstock. Then using the gypsy I removed all the inner contour lines and cut the shape of the house in grey cardstock. (The House is 11")

The ghosts are from Happy Hauntings, and I just placed them randomly but I thought they looked playful (lol)

When I pasted the house together I cut a 6" by 12" chipboard and covered it with black cardstock, I also placed a strip of gray left over cardstock at the bottom. I hand cut the green grass thingies at the ends of the house. I inked around with white chalk ink on the black and with black on the rest of the colors. The stars are from the sticker sheet from the Echo Park Kit.

The back of the cover also got a embellished:


I cut another Haunted House without the contours in black to cover the grey one, but I pasted it on the opposite side of the chipboard cover. Then I cut a 6" X 12" black cardstock, and stars part of the Bat Festival paper from the collection. I glued that, and just folded the corner. I inked using black ink all around. The candelabra is from October 31, the candles did not come out that good, so I got a little square of orange cardstock and folded it so that it would fil in the candle holder, inked with black and made the flame with stickles (Black Diamond and Orange Peel), the pedestal of the candelabra also has stickles.

The frame behind (in purple) is the inside of a frame from French Manor, and the Happy Halloween is one of the element stickers.

I hope you enjoyed this first part of the Mini Book, let me know what you think.

-Marie
Happy Scrapping!

Tuesday, August 17, 2010

New Blog, New Look...New Idea

Well I heard from a friend that a blog is the best thing ever, but what am I going to do with 1 follower, especially when that follower is me!!! Well I am hoping to make more acquaintances this time around.

So what is this blog about. Scrapbooking, card making and a couple things about cricut. I will be posting videos, and tutorials over the next couple of days. So stay tuned.